Print Checks Without Software
Specially Small and Medium Enterprises spend their valuable time to write checks and experience difficulties like checks got returned. The third party software developers take this opportunity to promote their products and purchasing these software cost to SMEs which is unbearable to them. Printing checks on behalf of writing checks by hand will benefited as follows.
- Save your valuable timePrinting checks reduce you time of preparing checks rather than writing checks by hand (here you do not want to write the amount in words, no need to write the date, print four check at once and no need to care about the accuracy of words.
- Reduce your costWriting checks by hands will results cancelling lot of checks which is caused to increase the cost of check papers. Printing checks avoid cancelling checks in so many ways. It facilitate to get the amount in words and the date automatically which are the most factors can be misstated.
- Provide securityWritten checks can be altered easily rather than a printed one. Ink erasers, which facilitate to erase writings on checks, are available in the present market. You may wonder if you see SEE THIS video. Printing checks can be avoid difficulties like this.
- Provide standards to your companyGiving a printed check to your suppliers will provide a good image about your financial position rather than giving a written check. The image of your business to bankers will become more smooth.
Get The Excel File Ready
01. Download THIS EXCEL file
(No passwords/not protected/open to edit and format as your choice)
(No passwords/not protected/open to edit and format as your choice)
02. Save it in a place do you like to keep it protected
03. Open the file
04. Obtain the developer tab on the ribbon if not available
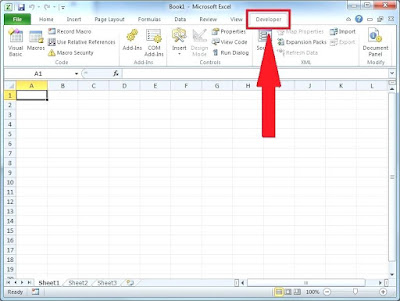
How to activate the developer tab
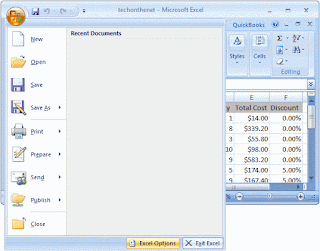
To display the Developer tab, click on the Microsoft Office button in the top left of the Excel window and then click on the Excel Options button
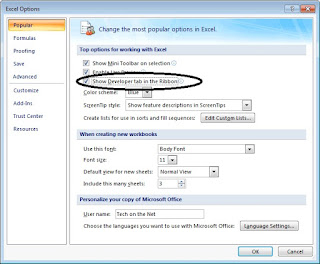
When the Excel Options window appears, click on the Popular option on the left. Select the option called "Show Developer tab in the Ribbon". Then click on the OK button.
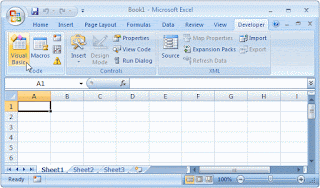
 05. Click on "Visual Basic" icon on the developer ribbon
06. Click on "Insert" and then "Module"
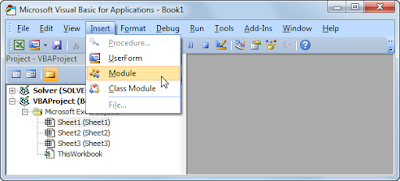
07. Copy the following code at once and paste on to module sheet (All Blue Colored words)
Function SpellNumberToEnglish(ByVal pNumber)
'Updateby20131113
Dim Rupees, Cents
arr = Array("", "", " Thousand ", " Million ", " Billion ", " Trillion ")
pNumber = Trim(Str(pNumber))
xDecimal = InStr(pNumber, ".")
If xDecimal > 0 Then
Cents = GetTens(Left(Mid(pNumber, xDecimal + 1) & "00", 2))
pNumber = Trim(Left(pNumber, xDecimal - 1))
End If
xIndex = 1
Do While pNumber <> ""
xHundred = ""
xValue = Right(pNumber, 3)
If Val(xValue) <> 0 Then
xValue = Right("000" & xValue, 3)
If Mid(xValue, 1, 1) <> "0" Then
xHundred = GetDigit(Mid(xValue, 1, 1)) & " Hundred "
End If
If Mid(xValue, 2, 1) <> "0" Then
xHundred = xHundred & GetTens(Mid(xValue, 2))
Else
xHundred = xHundred & GetDigit(Mid(xValue, 3))
End If
End If
If xHundred <> "" Then
Rupees = xHundred & arr(xIndex) & Rupees
End If
If Len(pNumber) > 3 Then
pNumber = Left(pNumber, Len(pNumber) - 3)
Else
pNumber = ""
End If
xIndex = xIndex + 1
Loop
Select Case Rupees
Case ""
Rupees = "No Rupees"
Case "One"
Rupees = "One Dollar"
Case Else
Rupees = Rupees & " Rupees"
End Select
Select Case Cents
Case ""
Cents = " and No Cents"
Case "One"
Cents = " and One Cent"
Case Else
Cents = " and " & Cents & " Cents"
End Select
SpellNumberToEnglish = Rupees & Cents
End Function
Function GetTens(pTens)
Dim Result As String
Result = ""
If Val(Left(pTens, 1)) = 1 Then
Select Case Val(pTens)
Case 10: Result = "Ten"
Case 11: Result = "Eleven"
Case 12: Result = "Twelve"
Case 13: Result = "Thirteen"
Case 14: Result = "Fourteen"
Case 15: Result = "Fifteen"
Case 16: Result = "Sixteen"
Case 17: Result = "Seventeen"
Case 18: Result = "Eighteen"
Case 19: Result = "Nineteen"
Case Else
End Select
Else
Select Case Val(Left(pTens, 1))
Case 2: Result = "Twenty "
Case 3: Result = "Thirty "
Case 4: Result = "Forty "
Case 5: Result = "Fifty "
Case 6: Result = "Sixty "
Case 7: Result = "Seventy "
Case 8: Result = "Eighty "
Case 9: Result = "Ninety "
Case Else
End Select
Result = Result & GetDigit(Right(pTens, 1))
End If
GetTens = Result
End Function
Function GetDigit(pDigit)
Select Case Val(pDigit)
Case 1: GetDigit = "One"
Case 2: GetDigit = "Two"
Case 3: GetDigit = "Three"
Case 4: GetDigit = "Four"
Case 5: GetDigit = "Five"
Case 6: GetDigit = "Six"
Case 7: GetDigit = "Seven"
Case 8: GetDigit = "Eight"
Case 9: GetDigit = "Nine"
Case Else: GetDigit = ""
End Select
End Function

Now your excel file is ready to all formulas what I have added.
Get the Printer Ready
01. Click Start button and go to "Device and Printers"
01. Click Start button and go to "Device and Printers"
02. Click on " Print Server Properties"
03. Click on "Create a new form" check box
04. Give a name to the new paper size as your choice.
05. Measure you checks' height and width using a ruler
06. Select a unit as convenience to you
Metric - the width and height of the check should be given by centimeters
English - the width and height of the check should be given by inches
07. Just enter the height and width on the relevant box
08. Keep printer area margins as zero
09. Click on OK
Now your printer is ready to print your check
Adjust the Content to fit to your check
01. Remove stapler pins of the check book and make it unbinded
02. Make some photocopies of a blank check to original size without zooming
in or zooming out
03. Use a paper cutter and cut extra spaces of the copy to get it as to original
size and make sure the copy and the original check both are same in size
04. Open the excel file
05. Select "Cheque Writer" sheet
06. Change the view as "Page Break Preview"
01.Select "View" Ribbon
02. Click on "Page Break Preview"
07. Set it with new paper size
(Now the new paper size should be in the list of paper sizes. If not it means the printer is not supported to print that size. Do not worry. You can select a size that is most closed to your check size and get it to correct position to print adjusting empty columns and rows of the excel sheet as described below)
01. Select "Paper Layout" Ribbon
02. Click on "Size"
03. Chose your new paper size
08. Once you select the size the pages should be broken with 11 rows to each pages. This excel has 4 pages. It means you can print up to 4 checks at once.
09. If the pages do not break with 11 rows to each pages then
01. Click on row number 11 (Click on number to select entire row)
02. Press and hold the control key
03. Click on row number 22,33, and 44
04. Right click on a selected row
05. Click on row height
06. Increase/Decrease the height one by one till the pages break with 11 rows.
10. Click on "Voucher" sheet and enter data to the first Voucher
11. Put a copy of the check to the printer
12. Get the paper tray fit the to the paper
13. Click on "Cheque Writer" sheet and print the first page to test
14. Now the define errors and adjust columns and rows till it get fit to your check.
Note - If you wish to increase or decrease the width of a column select the column by clicking on the letter of the column (you should select the entire column) and if you wish to increase or decrease the height of a row you should select all four rows similar to the selected row like we did at 09.
15. Keep the excel file protected once you done to avoid changes after that.


Comments
Post a Comment